Host your nuxt.js app on AWS
Step-by-step guide from creating a new nuxt.js app to host it on an AWS instance.


This is a step-by-step guide, from creating a brand new nuxt.js application to deploying it on an AWS instance. So without any further ado let's get started.
Table of content
- Creating a new NuxtJs app
- Configuring a new AWS instance
- Pointing domain to AWS instance
- Setting up AWS instance
- Setting up Nginx
- Obtaining SSL certificate
Creating a new NuxtJs app
Before starting please make sure you have npm or yarn installed on your local machine. For this tutorial, I will be using yarn. You can use any of the two package managers.
yarn create nuxt-app <project-name>
cd <project-name>
yarn install
With the above commands, you have successfully created a brand new nuxt.js app. Now let's run it up on a local server.
yarn dev
With this, the project is successfully running on localhost:3000.
By default, the project will run on port 3000 but we can change it to any port by adding the following configuration in the nuxt.config.js file.
export default {
    server:{
    port: 3000, //change port number here
  },
}
Now we have our project up and running on the local machine, let's add some configurations that will be recognized by PM2 as a configuration file.
Create a new file ecosystem.config.js in the root directory of your project and add configuration to it:
module.exports = {
  apps: [
    {
      name: 'NuxtAppName', //replace with your project name
      exec_mode: 'cluster',
      instances: 'max', // Or a number of instances
      script: './node_modules/nuxt/bin/nuxt.js',
      args: 'start'
    }
  ]
}
We are done with our basic configuration for this app. We can now push it to GitHub so that we can clone it later on our AWS instance.
Configuring a new AWS instance
For this tutorial, I am assuming you have an AWS account with an ec2 instance set up with basic security groups. If not watch this video tutorial to set it up.
Now, let's add an inbound rule so that your instance can intercept HTTP and HTTPS requests. For this log into your AWS account under the services drop-down menu select ec2. Select the running instance for which you are adding the inbound rules.
Under the security, tab select the security group, then select edit inbound rules.
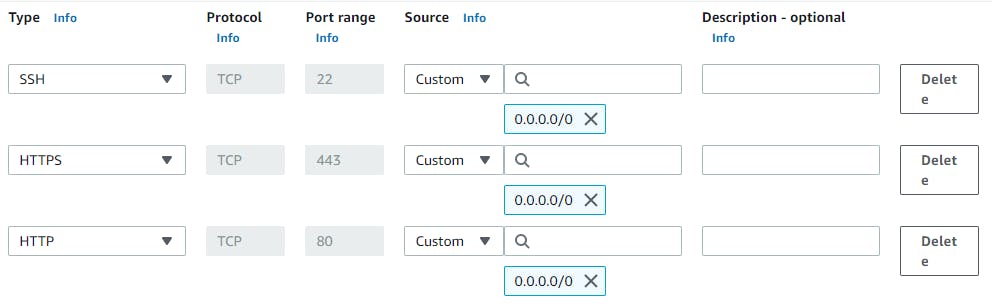
Add rule for HTTP and HTTPS. Your inbound rules should look like these:
Pointing domain to AWS instance
You can skip this part if don't have a domain name, you can still access your hosted application through the public IP but it's highly recommended to have a personal domain.
Now let's point our domain name to our newly created instance. For this log into your AWS account and under ec2 copy the Public IPv4 address of the instance.
Now log into your domain registrar account, for this tutorial I will be using hostinger.
Go to the console and add a new DNS record of type A
To know more about types checkout this.
Setting up AWS instance
SSH into your AWS instance.
Watch this video tutorial to know how to connect to the instance.
Now we need to install some tools and packages. Let's first install node.js.
sudo apt update
sudo apt install node.js
sudo apt install npm
To update node to the latest stable version:
sudo npm cache clean -f
sudo npm install -g n
sudo n stable
We will be using yarn so let's install yarn as well.
npm install --global yarn
yarn --version
Let's install PM2 to keep our application online.
cd ~
sudo npm install pm2 -g
Let's install git as well so that we can clone our project to the instance.
sudo apt install git-all
git --version
Now to clone our GitHub repository we need a personal access token as password authentication is deprecated now. To set up please see this video tutorial.
Now let's clone our repository from github.
git clone <repository-link>
cd <project-name>
yarn install
Let's build our project and host it on the local server.
yarn build
pm2 start
With this, our project is now live on localhost:3000 of our instance. You can see the process using the command pm2 l.
Setting up Nginx
Now we have our project running on localhost:3000, let's reverse proxy it using nginx server.
Learn more about reverse proxy here.
Let's first install nginx using the command:
cd ~
sudo apt install Nginx
Now let's create a basic configuration for our project.
cd /etc/nginx/sites-available/
sudo nano my-domian.com
Do not forget to replace my-domain.com with your domain name.
Add basic configuration to my-domain.com file.
server {
    listen 80;
    listen [::]:80;
    server_name your-domain.com;  #replace with your domain name.

    location / {
        proxy_pass http://localhost:3000;
        proxy_http_version 1.1;
        proxy_set_header Upgrade $http_upgrade;
        proxy_set_header Connection 'upgrade';
        proxy_set_header Host $host;
        proxy_cache_bypass $http_upgrade;
    }
}
Now all of the incoming traffic to your-domain.com on default http 80 port will be redirected to localhost:3000.
Now remove the existing, default configuration:
sudo rm default
And link our new config file to the sites-available directory:
sudo ln -sf /etc/nginx/sites-available/your-domain.com /etc/nginx/sites-enabled/your-domain.com
Finally, test the new Nginx configuration and if everything is fine — restart the Nginx server:
sudo nginx -t
sudo systemctl restart nginx
Your project is now live. Just go to your domain name see it live.
Note: DNS propagation may take up to 24 hours.
Obtaining SSL certificate
Now let's obtain the SSL certificate for our app. For this, we need a package called certbot, let's install it.
sudo apt install certbot python3-certbot-nginx
Now lets obtain our SSL certificate
sudo certbot --nginx -d my-domain.com -d www.my-domain.com
If this is your first time running certbot, you will be prompted to enter an email address and agree to the terms of service. After doing so, certbot will communicate with the Let’s Encrypt server, then run a challenge to verify that you control the domain you’re requesting a certificate for.
If that’s successful, certbot will ask how you’d like to configure your HTTPS settings.
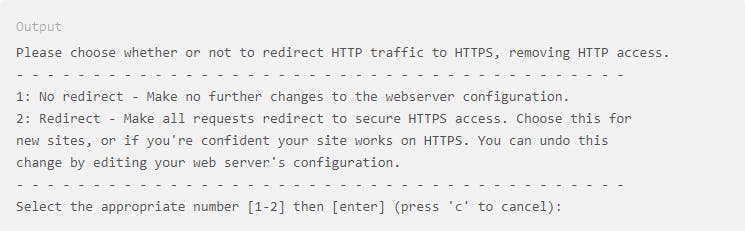
Enter 2 if you want your HTTP request redirected to HTTPS else enter 1 and hit ENTER.
And you are done. ENJOY! 🥳